
Sep 02, 2025
Let’s be honest: most websites don’t fail because of bad colors or the wrong font. They fail because there was never a proper website design process in place. Business owners often think, “We just need a quick website,” and jump straight to the visuals, a homepage mockup here, a logo there. But when the site goes live, users bounce, conversions stall, and suddenly it feels like you’ve wasted months of effort.
Now imagine the opposite. Picture a website project with clear goals, a defined roadmap, and predictable milestones. Every step is accounted for, from discovery to launch, and nothing is left to chance. That’s exactly what an 8-step website design process delivers. It’s the difference between a site that drains resources and one that drives results.
At Studio Ubique, we’ve refined this process over hundreds of projects. What follows is a practical, no-fluff guide that takes you through each stage, so you know exactly what to expect, why each step matters, and how skipping one can come back to bite you later.
Takeaway: A structured process turns chaos into clarity, and that’s what your website deserves.
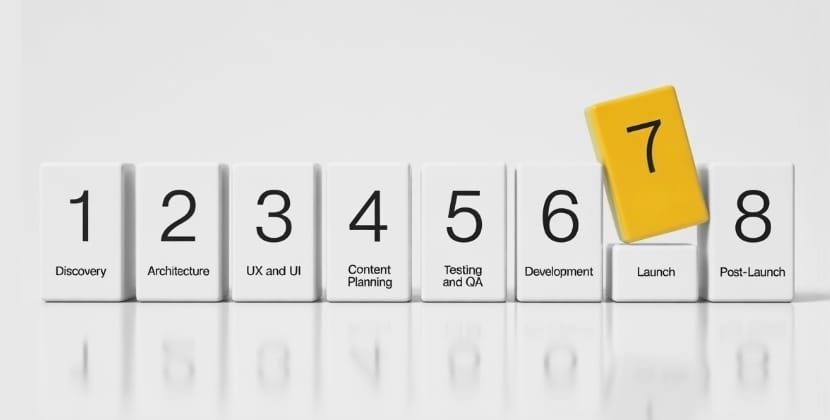
The website design process in 8 steps
Step 1: Discovery and strategy
Every strong website starts with strategy, not Photoshop. Before we touch a single pixel, we ask:
- Who are your users?
- What problems are they trying to solve?
- What action do you want them to take?
- How do we measure success?
This discovery phase often includes workshops, competitor analysis, and a deep dive into your existing digital touchpoints. Think of it as mapping out your business goals alongside your users’ pain points. Without this, design becomes guesswork, and guesswork is expensive.
Example: A Dutch retailer once approached us with a request for “a modern look.” But after strategy workshops, it became clear their real issue was confusing navigation that cost them sales. Had we skipped this phase, the shiny visuals would’ve looked great, but the problem would’ve remained.
Takeaway: Without strategy, you’re designing blind.
Step 2: Information architecture
With strategy in place, it’s time to plan the structure. This is where website design process flow comes in. We create site maps that show how pages connect and wireframes that sketch out what goes where.
Why does this matter? Because a website isn’t just a digital brochure; it’s a journey. If users can’t find what they need in two or three clicks, they’ll leave. Wireframes ensure the skeleton is solid before we dress it up with visuals.
Studio Ubique’s perspective: we treat wireframes like architects treat blueprints. You wouldn’t build a house by picking curtain colors first, the same logic applies here.
Takeaway: Great websites stand on solid foundations, not flashy first impressions.

Step 3: UX and UI design
Now the visuals take shape. Website design process steps shift from planning to crafting real user experiences. We focus on UX (usability, flow, conversion paths) and UI (visuals, typography, branding).
This is also where your choice of agency matters. A web design partner who understands both aesthetics and usability can save you from costly mistakes.
Example: For a membership platform we designed, we used progressive disclosure, hiding advanced options until users needed them. The result? Higher engagement and fewer support tickets.
Takeaway: Good design isn’t about being pretty; it’s about being useful.
Step 4: Content planning
Content isn’t an afterthought. It’s the voice of your business. During this step, we align design and words so they work together.
That means:
- Headlines that grab attention
- Body copy that explains benefits clearly
- CTAs that guide users without sounding pushy
- Case studies and blog posts for trust-building
Skipping content planning is like building a stage without rehearsing the script. We’ve seen websites where the design was ready but the copy was “TBD.” Result? Delays, rewrites, and layouts that don’t fit the final text.
Takeaway: Content and design are partners, not strangers.
Takeaway: Content and design are partners, not strangers.
Step 5: Development
Once design and content are locked, the build begins. This is where code takes over. Depending on your needs, that might mean WordPress, WooCommerce, or custom development. If you’re unsure which direction fits your project best, explore our web development services, they cover everything from lean WordPress builds to complex custom platforms.
Studio Ubique’s approach: we code lean. No bloated templates, no unnecessary plugins. A streamlined backend means faster load times, better security, and fewer headaches later.
We also ensure responsive design from the start. More than half of traffic is mobile, so if your site only looks good on a 27-inch monitor, you’ve already lost.
Example: A startup client came to us after using a pre-made theme. It looked fine, but the site crawled under real-world traffic. Rebuilding with a lean custom theme cut page load time from 6 seconds to under 2, and their conversion rate followed.
Takeaway: Development is where ideas become reality, so don’t compromise here.

Step 6: Testing and QA
Ever launched a site only to find half the buttons don’t work on mobile? That’s what happens when QA is skipped.
We run every project through a gauntlet:
- Browser testing (Chrome, Safari, Firefox, Edge)
- Device testing (desktop, tablet, mobile)
- Speed checks
- Accessibility audits
- Security hardening
This isn’t optional polish; it’s essential quality control. Fixing bugs after launch is like fixing a leaking roof after it rains, possible, but much messier.
Takeaway: Better we break it first than your users.
Step 7: Launch
Launch day isn’t champagne and confetti, it’s technical precision. DNS, SSL certificates, hosting configuration, backups, and email routing all need to align.
At Studio Ubique, we use detailed launch checklists to avoid surprises. That way, when your new site goes live, it’s stable, secure, and ready for traffic from day one.
Example: For an NGO client, we scheduled launch at 2 a.m. local time to minimize downtime. By sunrise, the new site was live and their team didn’t lose a single donation.
Takeaway: Smooth launches are planned, not improvised.
Step 8: Post-launch optimization
Many think the job ends once the site is live. In reality, that’s when the work begins. Analytics, A/B testing, plugin updates, and ongoing optimization ensure your site doesn’t stagnate.
We track KPIs, monitor user behavior, and make iterative tweaks. This way, your website adapts as your business grows instead of becoming obsolete after two years.
Takeaway: A website is a living asset, not a one-time project.

Conclusion
The website design process isn’t rocket science, but it is a discipline. Skip steps, and you risk confusion, wasted budget, and poor results. Follow this 8-step roadmap, discovery, architecture, design, content, development, testing, launch, and optimization, and you give your website the foundation it needs to perform.
If you want clarity instead of chaos, structure instead of stress, and results instead of regrets, the process is your friend. And if you don’t have time to figure it all out yourself, that’s where we come in.
FAQs
What is the average timeline for a website design process?
Most projects take 8–12 weeks, depending on scope and complexity.
How much involvement is required from my side as a client?
You provide input at each milestone — strategy, design feedback, and final approval.
Can I update my website myself after launch?
Yes, with WordPress or custom CMS we deliver, you’ll have full access to edit and grow content.


